

Garage Door Damaged in a Break-In? Read the Marks Backward
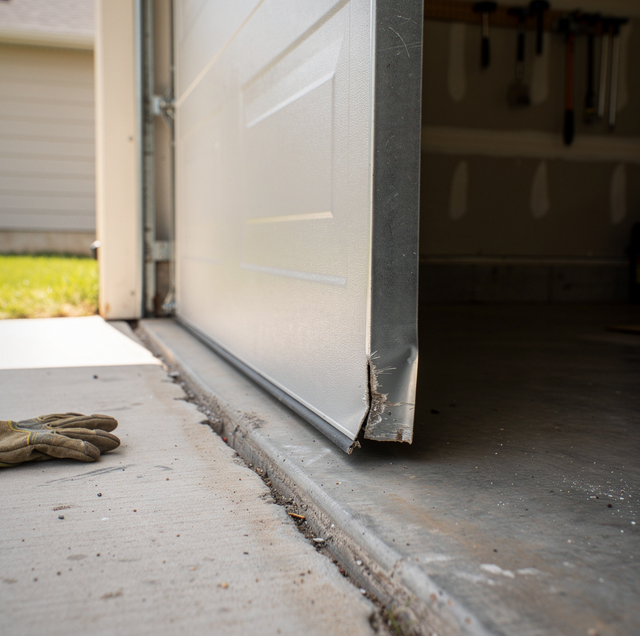
Quick Answer: Work backward from the visible mark. Whatever took the load during the attempt, moved and stayed moved, or was left holding afterward is where the real damage sits, and almost none of it shows on the outside face.
You come back to a door standing where you left it, with a scrape across the bottom panel and a corner that no longer sits flat against the frame. That mark is the newest thing on the door and also the last event in a short sequence. Something was holding the door's weight while force was applied. Something moved. Something was left carrying the load afterward. Photograph what you can see before touching anything, then read the hardware backward from the mark through the parts that had to be involved for it to exist.
Working Backward From the Mark You Can See
Read the mark as a record of what happened rather than as the damage itself. Scuffed paint, a fresh dent, or a crease running at an angle instead of along a factory panel line all belong to that record. At the bottom edge and the nearest corner, a mark often appears as compressed or torn metal, with the paint pushed to bare steel, indicating the load was applied there and held long enough to deform the skin. Then check the gap between the bottom of the door and the concrete across its full width: if it's wider at one end than the other, the corner region itself has moved.
A Moment Before That: What Was Holding the Weight
For a mark to land at a bottom corner, something on the other side of the panel had to be resisting. On a sectional door, the counterbalance works through the lift cables into the bottom brackets. Each bottom bracket is a stamped fitting bolted through a bottom corner, anchoring a lift cable and carrying its full pull whenever the door moves. Those parts were under load when the force arrived, which made them the first to look at. A bent bracket, a backed-out bolt, or a hairline crack near a bolt hole is a load-bearing point asked for more than it was built to give. Run a hand lightly along the inside face of the bottom section, fingers on the face of the panel and out of the joints between sections, feeling for a spot that flexes more than the rest; a factory-tight panel should not give under light pressure. An end stile, the vertical edge post at each side, can bow or crack near a hinge screw without looking wrong from a distance.
A bent or cracked bottom bracket is still under full lift-cable tension even when the door looks fine. Treat any bend, crack, or rotation at this bracket as a stop-and-call finding, not something to monitor.
What Moved and Has Not Moved Back
Some of what the attempt did settled back where it started; some did not, and that second set is what you are hunting for. A bottom bracket, even slightly rotated against its corner, has moved and stayed moved, and so have bolt holes that now look elongated instead of round. Follow each lift cable up from its bracket to the drum. A cable under stress does not necessarily snap; more often it goes slack, or crowds out of the groove it should sit in on the drum. A compromised cable's load reacts at the end bearing plates, the mounts at each side of the horizontal shaft, not at the middle where the springs sit. Higher up, the flag bracket tying each vertical track to the framing either sits snug or stands off by a visible gap. And inside the throat of the track, the channel the rollers ride in, a stretch narrowed or spread shows up as a roller sitting unevenly or catching.
What Was Left Carrying the Load Afterward
Once the force stopped, the door settled onto whatever could still hold it, and that is the arrangement it has held ever since. A bracket cracked near a bolt hole is under full lift-cable tension right now. A flag bracket standing off the framing is keeping the top of that vertical track in line right now. Neither announces itself, which is why a settled-looking door tells you nothing about whether it is sound.
Force That Traveled Upward Into the Rail
Not every attempt stops at the panel. If the door was forced upward at any point, that load ran into the top section and from there into the opener. The J-arm, the linkage connecting the opener's inner carriage to the top section, can be bent, twisted, or sitting at an odd angle against the rail. Where the arm bolts to the top section, loosened screws or a mount starting to pull through the panel matter as much as the arm itself. At the far end of the rail, the header bracket tying it to the framing can show backed-out screws, a bend, or a droop where it meets the wall. A shifted motor housing is worth photographing and leaving alone.
The Wiring the Attempt Pulled With It
The low-voltage side takes damage that leaves almost nothing to see. The safety sensors at the bottom of each track, the wall console beside the door into the house, and any outside keypad all run on thin wire stapled along the jamb and up the framing. A door that flexes hard enough to shift a bracket can pull that wire out of its staples, well away from anything visible, and a conductor can be stretched or parted within insulation that still looks intact. Note anything hanging loose, and any sensor bracket knocked out of square, then leave it for a technician to trace. What the sensors do or do not do is no basis for deciding the door is safe to run.
A Responder Breach Runs the Same Backward Read
A door forced by a fire crew, a paramedic, or a locksmith on a lockout call leaves the same evidence in the same order; the door has no way of knowing who applied the load or why. Read it in the same direction. Two things differ in practice. The event is on record, so the time and the reason are already written down by whoever attended. And a responder will often leave the door deliberately open so the opening stays usable, which means it has been held up on hardware nobody has inspected. That is the one case where the position you find the door in is a finding of its own.
Where the Door Sits Right Now
Every finding above is a static reading, taken with the door exactly where it is. Move it, and you spend the reading: a cycle re-seats cables and rollers, and it asks parts that have been holding since the attempt to take a moving load for the first time. Leave the door in the position it is in until each point above has been checked. When you make the call, give the findings in the order you collected them; a technician arriving with the sequence reconstructed can go straight to the parts that were under load.
Frequently Asked Questions
The findings nobody can reconstruct afterward are the inside ones, and each needs a particular angle. Shoot each bottom bracket square to the corner it is bolted to, so its rotation reads in the frame, with the bolt heads in the same shot. Take the flag bracket from the side rather than head-on, because a gap between bracket and framing only shows in profile. Get the J-arm from below the rail line so its angle against the rail is recorded, and do all of it before the door moves again.
That decision, and any question about what a policy will pay, is between you and those parties, not something to settle before the door gets looked at. What is worth planning for is that a repair permanently changes the evidence: once a bent bracket comes off, only your photographs remain. Ask that replaced parts be set aside for you instead of hauled away.
Cable seating and roller position both reset on a cycle. A cable that had crowded out of its groove can re-seat onto a crooked wrap and look orderly again, and a displaced roller can find its way back, so neither reads reliably afterward. Bracket rotation, elongated bolt holes, and a bent arm do not reset, and those still read accurately whenever you get to them. The findings a cycle erases belong to the parts carrying the door's weight.
No. Doing that would put the door's full weight onto the very brackets and cables you are trying to inspect, before anyone knows whether they can still hold it. The release cord is safe to use only with the door fully closed and the counterbalance intact, and it is never a way to hold a door open.
Possibly. A section is part of the weight the counterbalance was set up against, so a replacement in a different steel gauge, or an insulated section where the original was not, changes what the springs are holding. When only one section is swapped, the counterbalance must be reconsidered based on the new weight. It is also worth asking early whether that panel design is still made, since a discontinued profile can turn matching into the longest part of the job.
What a given warranty covers is a question for whoever wrote it, not for a technician. What a technician can give you is the split that matters on the job: which parts were damaged and which were only disturbed. Hardware that backed out but is otherwise sound gets re-secured; steel that has yielded gets replaced because it will not return to shape or hold a fastener the same way twice. Ask for that split part by part, in writing.
Schedule an emergency inspection — bring in emergency garage door repair in Pflugerville while the door is still sitting where the attempt left it, and follow it with a full garage door safety inspection once every load-bearing point has been cleared. Squared Away Garage Door Service serves Cedar Park and Central Texas. Call (512) 456-3781.
