

Garage Door Bottom Brackets: The Bolts to Never Touch
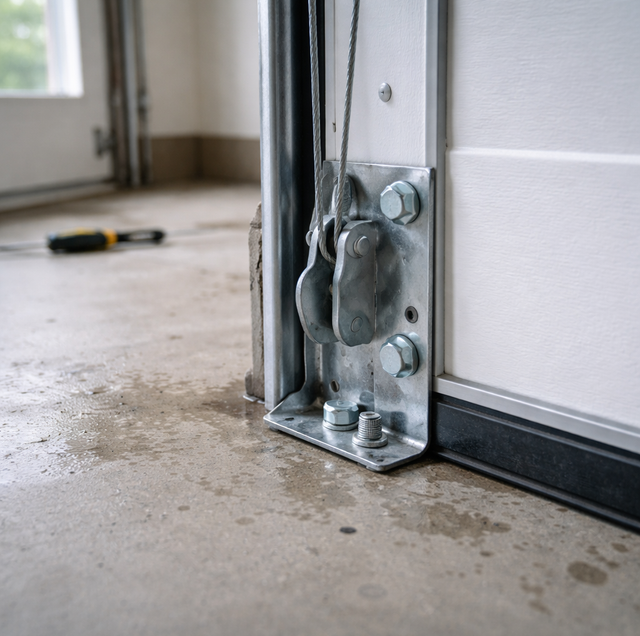
The bracket bolted to each bottom corner of a garage door does not look like a hazard. It is a small piece of stamped steel with a few bolt heads, wearing the same dull finish as the hinges a foot above it, mounted at the one height where every tool in the garage reaches comfortably. Nothing about it separates it from ordinary hardware. That resemblance is the problem, because on most doors those bolts are holding back stored energy and the hinges above them are not.
What the Bottom Bracket Does
Each bottom corner of a sectional door carries a bracket doing two jobs at once. It holds the stem of the bottom roller, the wheel that rides in the vertical track, and it anchors the end of the lift cable. The cable end is fitted with a swaged stop or formed loop that seats onto a pin or slot in the bracket, so cable and bracket become one assembly. The bracket fastens through the end stile, the vertical framing member at the edge of the bottom section, with lag screws, carriage bolts, or self-drilling fasteners.
Trace the load path and the reason for caution becomes clear. A torsion spring on a shaft above the door header stores the energy that counterbalances the door's weight. That shaft turns a grooved cable drum at each end; each drum reels in a braided steel cable, and each cable terminates at a bottom bracket. Whatever the spring is holding, the bracket is holding too. Doors using extension springs route the load through pulleys instead, but the lift cable still ends at the same place.
Why Those Bolts Are Loaded Even With the Door Closed
A common assumption is that a door resting on the floor has gone slack, since nothing is holding it up. The opposite is closer to the truth. A torsion spring is at its maximum wind when the door is fully down, because the cables have unwound completely off the drums on the way there, winding the spring tighter with every inch of travel. The cables stay taut against the drums, and on a typical double-car steel door each cable can carry well over a hundred pounds of pull while the door sits perfectly still (the exact figure depends on the door's weight and the spring it's paired with). Tension peaks with the door closed and eases as the door rises and its weight shifts onto the horizontal tracks. The bracket at floor level is not a resting part. It is a loaded part within easy reach.
The bolts in a bottom bracket have more in common with the pin holding a loaded mousetrap than with the screws in a cabinet hinge, and the load gives no warning before it moves. Back those fasteners out while the cable is under tension and the bracket can leave the door face fast enough to break bones. The cable can whip as it releases from the pin, and the corner of the door can drop and twist in the track, bending the end stile or pulling the opposite cable off its drum. None of it happens slowly enough to react to.
Many manufacturers stamp or affix a warning label onto the bottom bracket, often in red or yellow, stating that the part is under extreme tension and should not be removed.
Which Fasteners on the Door Carry Spring Load
Most hardware on a door carries no cable tension at all, and knowing which parts do makes the rest far less intimidating.
Intermediate hinges: The hinges between sections, usually numbered by the manufacturer and stamped into the steel, carry panel weight and let the sections articulate around the track curve. They sit outside the cable's load path entirely.
End hinges: These hold the roller stems at the side of each joint. They see more force than an intermediate hinge because the roller pushes against the track, but no cable terminates there.
The top fixture: The adjustable bracket at the top corner holds the top roller and sets how tightly the door seals against the header. On a torsion setup, no cable ends here.
The bottom bracket: The only place a lift cable anchors to the door, and the only bracket under spring load with the door down.
A working rule for anyone standing in the garage with a wrench: if you can trace a cable, a spring, or the shaft above the door to the fastener you are about to turn, put the wrench down. That covers the bottom brackets, cable drums, spring anchors, the center bearing plate, and the winding cones.
Signs a Bottom Bracket Needs a Technician
The bracket usually degrades in ways visible from a few feet away, which is the right distance to inspect from.
- Rust bleeding from the bolt heads: Often with orange streaking down the bottom section. Rust at the fastener holes matters more than rust on the flat of the bracket, since that is where the steel is most loaded.
- A bracket pulled slightly away from the door face: Or bolt holes that look oval rather than round. Elongated holes mean the fastener has been working against the steel and the connection has begun to move.
- Dimpling or tearing in the door skin around the bracket: On lighter-gauge steel, this means the bracket has begun pulling through the panel before failing itself.
- A pop, bang, or metallic squeal from one bottom corner: Most noticeable as the door starts to lift, which is when cable tension is highest.
- One bottom corner lagging: As the door leaves the floor, or the door sits unevenly against the weather seal.
Moisture drives much of this. Condensation forms on a cool slab, rain arrives on tires, and a failing bottom seal lets water stand against the lowest hardware on the door. Both ends of the temperature range contribute too, since steel expands and contracts through hot stretches and cold ones alike, working at fasteners that were snug on installation day. A door serving as the household's main entry also runs far more cycles than one opened twice a day, and every cycle loads the same two brackets again.
What Is Safe to Do Yourself
The line between professional-only and homeowner-friendly is not fuzzy, and there is real maintenance on the safe side of it.
Lubricate the hinges and rollers: Use a garage door lubricant, typically a white lithium or silicone-based spray, on hinge pivot points and roller bearings. Skip general-purpose penetrating sprays, which are built to dissolve and displace and will strip the lubricant you want to keep. Sealed-bearing nylon rollers need nothing sprayed into the wheel, only at the stem and hinge.
Wipe the tracks, but do not grease them: Tracks should be clean and dry. A roller is meant to roll rather than slide, and grease in the channel collects grit that grinds the wheels. A damp rag and a mild household cleaner are all you need.
Clean and check the photo-eyes: The safety sensors sit low on either side of the opening, within roughly six inches of the floor, exactly where dust and cobwebs land. Wiping the lenses and confirming the indicator lights are steady rather than blinking takes a minute.
Run the reversal test: Set a flat board about an inch and a half thick, such as a two-by-four laid flat, in the door's path and close the door with the opener. The door should contact the board and reverse. Manufacturers generally recommend this test monthly.
What a Technician Does Instead
When a bracket, roller, or track starts binding, the door fights the opener, and the opener stops or reverses. Turning up the force setting so the door pushes through that resistance is the wrong response: it drives the motor harder into hardware that is already coming apart, and it blunts the sensing that would otherwise catch a person instead of a bracket. If the door needs more force than it used to, the job is finding out why, not overriding the setting that flagged it.
A bottom bracket replacement is built around removing the load before anything gets unbolted. The door is clamped in the track with locking pliers so it cannot shift, and the torsion spring is unwound with proper winding bars until no stored energy remains. Only then does the bracket come off.
The replacement gets matched to the door, since brackets come in different gauges for different door weights and left and right are not interchangeable. A technician also inspects what the old bracket was mounted to: if the end stile is torn or the section skin has begun pulling through, a new bracket bolted into damaged steel will repeat the failure, and the real repair may involve a reinforcing strut or a new bottom section. The cable and drum get checked in the same visit, the spring is rewound to the door's correct lift weight, and the door is balance tested by hand with the opener disconnected.
Most of a garage door rewards a curious owner. Hinges, rollers, tracks, sensors, and the opener's safety tests are all fair game for anyone willing to spend twenty minutes with a rag and a can of lubricant. The bottom brackets are the exception for a physical reason rather than a cautious one: they are the two points where the spring's stored energy is held back by bolts you can reach without a ladder.
Frequently Asked Questions
Suppliers use the terms interchangeably, though they describe slightly different parts. Some doors use a one-piece stamped bracket combining the cable anchor and the roller carrier. Others use a two-piece fixture with a slotted, adjustable roller carrier that lets a technician fine-tune how the bottom roller sits in the track. Heavy-duty versions use thicker-gauge steel with a reinforced cable pin. Ordering the wrong style leaves the roller sitting at a different depth in the track, which is one reason a generic part off a shelf rarely fits properly.
No, and this assumption causes injuries. On a two-spring system, one broken spring leaves the intact one holding its full wind, so the cable on at least one side stays loaded. Even on a single-spring door, a snapped spring can retain partial wind in the remaining coils, and the cable can still suddenly move the hardware. A broken spring changes the diagnosis, not the danger.
Frequently. The spring already has to be unwound for a cable or bottom section replacement, so the added effort to swap the bracket is small, and the fasteners get replaced rather than reused. Reusing bolts in elongated holes is a common reason a bracket problem returns within a year or two. Technicians also replace both brackets as a pair when corrosion is the cause.
Only that labeling practices have changed. Warning labels became widespread as an industry convention, so a door installed decades ago may carry an unmarked bracket, and a label painted over or worn off by moisture is common on older hardware. A missing label says nothing about whether the part is under tension. Assume every bottom bracket on every sectional door is loaded.
Painting hides the part that matters. Corrosion at a bottom bracket almost always traces to standing water, and the usual source is a failed bottom weather seal or a damaged seal retainer letting water sit against the door's lowest edge. A coating does nothing about metal already lost around the bolt holes and makes the bracket harder to assess later. Fixing the seal addresses the cause; the bracket needs an inspection rather than paint.
More of it, since heavier doors mean higher cable tension, and some use tamper-resistant fasteners specifically to discourage untrained adjustment. Rolling steel doors have no bottom bracket at all: the bottom bar attaches to the curtain, and the counterbalance lives inside the barrel above the opening, relocating the stored energy rather than removing it. Facility maintenance schedules for these doors generally call for a trained technician to check the hardware at set intervals rather than waiting for a visible fault.
Leave the bracket bolts alone and book Pflugerville garage door repair: the spring gets unloaded first, then the bracket, the cable end, and any other garage door hardware and parts that let go are replaced together. Call (512) 456-3781.
