

Garage Door Hail Damage: Photograph It in This Order
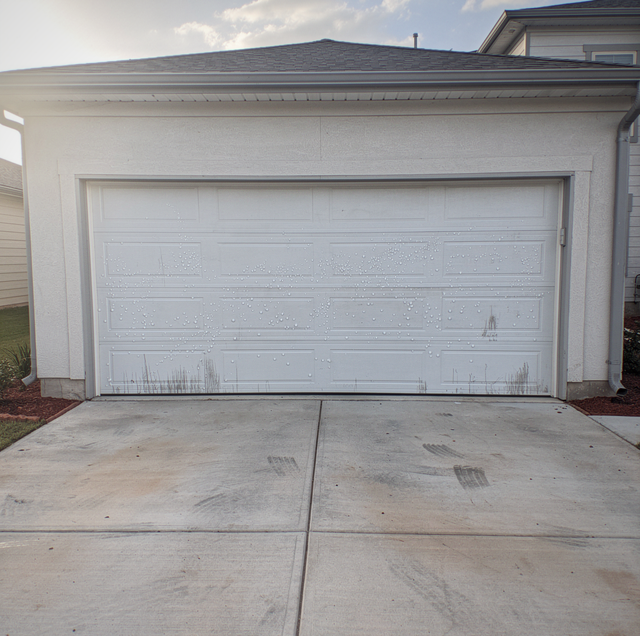
Quick Answer: Photograph the whole door first, then use low-angle light to reveal shallow dents, include something for scale, shoot every section in order, cover the interior and track, and timestamp the set.
The hail has stopped, the sky is clearing, and the garage door is sitting there with a scatter of new dimples you didn't put there. The instinct is to walk straight up to the worst-looking dent and start snapping pictures of it. Resist that instinct: a close-up of one bad dent, taken first and alone, doesn't show anyone reviewing it later how that dent sits relative to the rest of the door, when it happened, or how big it actually is next to something recognizable. The sequence below takes less time than a phone call and produces a record that stands on its own, whether the door needs one panel or a full replacement.
Start With the Whole Door Before Anything Moves
Before a single panel gets a close-up, stand back and get the entire door in one frame, straight on, from a distance of ten to fifteen feet. Take one from each side at an angle too, so the whole face of the door and the frame around it are visible in at least three photos. This is the baseline: the shot that shows how the door looked right after the storm, before a car pulled out, a ladder went up, or anything else disturbed the scene. Skip this step and every close-up that follows loses its context, because there's nothing to show where each dent sits relative to the others or to the frame.
Don't run the door through even one cycle before this sequence is finished. A cosmetic dent can catch a roller or bind a track once the panel flexes, turning a hail mark into hardware damage that's hard to separate from the storm.
Angle the Light So Shallow Dents Show Up
Straight-on light flattens a dent until it barely registers on camera, even one deep enough to catch a fingernail. Raking light, meaning light that hits the panel from low and to the side rather than head-on, is what actually shows the shape. Late afternoon or early morning sun does this on its own; midday sun or an overcast sky doesn't. If the light isn't cooperating, a flashlight or a phone light held low and to the side of the panel, a few inches off the surface and swept sideways, does the same job. Photograph each visible dent this way, not just once from the angle that happens to be convenient.
Hold the light source at roughly the same height as the dent, not above it. Light from above erases the shadow that makes a shallow dent visible in a photo at all.
Put Something for Scale in Every Frame
A dent photographed alone tells you it exists but not how big it is. A coin, a tape measure, a pen, or even the edge of your own phone case laid next to the mark gives anyone reviewing the photo later a way to judge size without guessing. Use the same object throughout the set if you can; a single coin used consistently across twenty photos reads more clearly than twenty different objects. This step takes seconds per shot and is the one most people skip because the dent already looks obvious in person.
Move Section by Section
Work the door one horizontal section at a time, top to bottom, and photograph each one individually even if it looks untouched, since a section with no visible damage is itself useful information: it establishes that whatever turns up elsewhere didn't come from that section.
Check the Struts and Hinges Inside
Open the door partway, if it still moves safely, and go inside the garage for the parts nobody sees from the driveway: the struts bolted across the back of the upper sections, the hinges connecting each section to the next, and the top section itself, where the opener's arm bracket attaches to the door. Hail rarely reaches any of this directly, but wind-driven debris and the flex of a panel taking an impact can bend a strut or loosen a hinge, and none of it shows from outside.
A deformed strut is easiest to catch by holding something straight, a level, a yardstick, or even a taut string, against its face along the full length; a true strut sits flush against the straight edge, and one that's taken an impact leaves a visible gap in the middle. Check the hinge leaves the same way: a hard hit can spread a screw hole into an oval instead of a round hole, or leave the leaf standing slightly proud of the section instead of sitting flat against it.
Photograph the top section from underneath as well, at the point where the operator arm's bracket bolts through the panel, since that connection carries repeated stress even on a door that wasn't struck there directly.
Get the Track, the Header, and a Timestamp
Photograph both vertical tracks along the sides of the opening and the curved horizontal section overhead, along with the header, the framing directly above the top section where the track curves back toward the ceiling. Wind and hail sometimes come with enough force to rack a track slightly out of alignment even when the panel damage looks minor, and that's easiest to catch in a photo taken now, while everything is still exactly where the storm left it. Set your phone's date and time correctly before you start, since most cameras stamp that information into the file automatically; if you're not sure yours does, hold a printed note or a piece of paper with today's date written on it in one or two frames as a backup. Same-day photos matter for more than the file's timestamp. The date of the storm itself is the fixed point everything else gets measured against, and a set taken a week later, after a few more days of weather and normal use, is a harder match to that date than one taken today. Get the camera out before the driveway has even dried off if you can.
What the Photos Are For
Once the set is complete, whether a particular dent is cosmetic or affects how the door actually operates is a separate question from what you've just captured, and a technician should inspect the door itself before anyone draws that conclusion either way. What you have now is a dated, complete visual record of the door's condition right after the storm, before anything about the scene changed. Any questions about what a policy covers or how a claim gets handled belong with your insurance carrier, not with the photos themselves; the photos are simply the record that makes that conversation possible.
Frequently Asked Questions
Hail rarely damages just one surface. Roofing, siding, fascia boards, and the fins on an outdoor AC unit are commonly hit in the same storm, so run the same raking-light-and-scale approach across those surfaces before repairs start anywhere on the property.
Don't stand underneath a section that looks bowed or misaligned, and don't force the door open to get a better angle in poor light. If safe daylight is hours away, photograph what you can now and shoot the full sequence again at first light; a same-night set plus a daylight set beats waiting on either alone, since a phone's low-light mode can wash out the same shallow dimples raking light is meant to reveal.
Steel sections typically show rounded dimples. Aluminum and wood carriage-style doors are more likely to crack, splinter, or separate at a seam instead of dimpling, so pay particular attention to corners and seams on those materials rather than just the flat panel face.
Yes. The lightning and grid-level voltage spikes that often accompany a hailstorm can reach an opener's control board even when the panels show no activity. Include a shot of the opener head unit and any blinking or unusual indicator lights in the same set.
A reasonable target is one full-width shot per section, one raking-light shot per visible dent from two clearly different angles, and at least one wide shot of the whole door for scale and context.
No. Leave loose paint flakes, ice residue, or debris exactly where it landed until the full photo set is finished. Brushing a panel off first can remove small flakes that mark exactly where an impact happened, which is information you can't put back once it's gone.
Get a professional inspection before you operate the door again — a technician can confirm what's safe to use and what needs repair or replacement. Bring the photo set with you when the technician arrives: the raking-light frames tell a Brushy Creek garage door repair crew exactly which sections to open first, and a full door safety inspection settles what a camera cannot, from strut alignment to how the top section tracks under load. Squared Away Garage Door Service works out of Cedar Park across Central Texas at (512) 456-3781.
