

Garage Door Safety Compliance for Landlords: 6 Key Checks
Turnover is when a rental finally gets a real inspection. The unit is empty, nobody's car is parked in the way, and you can run the door through a full cycle without asking permission first. Most owners spend that window on paint, flooring, and rekeying the entry door. The garage door usually gets a glance and a shrug, mostly because it still works, and a door that still works can hide a frayed lift cable, a photo eye that drifted out of alignment months ago, or a keypad code that the last tenant's ex-roommate still remembers.
Nothing below is legal advice. Habitability rules, inspection intervals, and what counts as an owner's duty vary by state and city, and some of it is set by your lease or your insurance carrier rather than by any statute. What follows is the practical list that experienced property owners and the technicians they call tend to run between tenants. Confirm your own obligations with your local housing guidance or your attorney.
The Two Safety Systems, and How to Test Each One
Openers built since the early 1990s carry two independent forms of entrapment protection, and they work on completely different principles.
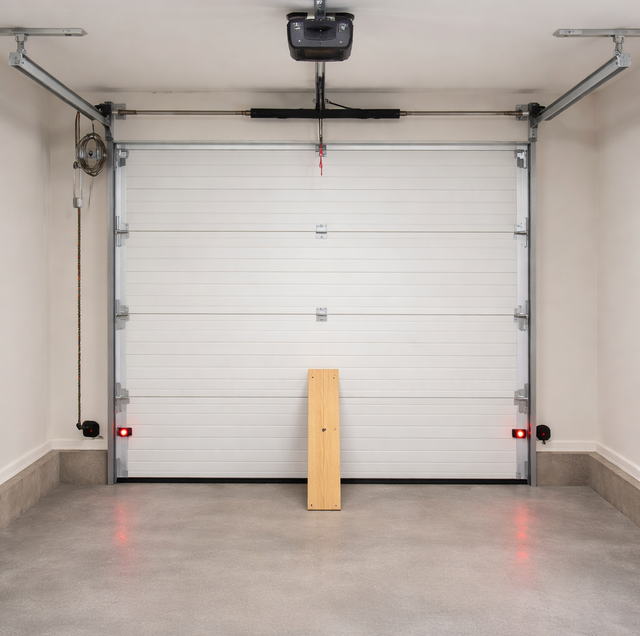
The first is the photo-eye pair: two small housings bracketed to the vertical track on either side of the opening, wired back to the motor head, aimed at each other across the doorway, and mounted low, generally no more than six inches above the floor. One emits an infrared beam, the other watches for it. Break the beam during a close cycle and the opener reverses to full open.
The second is force sensing inside the opener. As the door travels, the motor compares the resistance it meets against a learned profile. Hit something solid and the load spikes, and the opener reads that spike as an obstruction. On older units, the sensitivity is set with adjustment screws on the motor housing; newer units learn it during a limit-setting routine.
The two systems cover each other's blind spots. A photo eye is a tripwire, not a scanner: it guards one horizontal line a few inches off the slab and knows nothing about the rest of the opening. Force sensing watches the whole travel but only reacts after contact has already happened. A door with one working system and one dead system closes normally every single day, which is why the failure goes unnoticed until the day it matters.
Contact reversal (the board test): Lay a two-by-four flat on the floor, centered under the door, and close the door from the wall button while standing clear. The door should touch the wood, stop, and reverse to full open. Grinding, hesitating, or pressing down on the board is a fail. Laid flat, the board puts the bottom edge roughly an inch and a half off the slab at the moment of contact, which is why it is the common field test object.
Non-contact reversal (the beam test): Start the door down, then interrupt the beam from the side of the opening with a broom handle. It should reverse immediately. Never use a hand, foot, or any part of a person. While you are down there, look at the sensor indicator lights. Most brands show a steady LED on the receiving side when alignment is good, and a flickering or dark LED usually means a bumped bracket, a spider web across the lens, or a pinched wire where the cable staples to the jamb.
If the door fails the board test, the answer is never to raise the opener's force setting so it pushes through the resistance, since that quietly removes the protection the test exists to verify; a door that suddenly needs more force is reporting a mechanical change somewhere else.
Access Control: Every Way the Door Can Still Be Opened
Rekeying the front door and leaving the garage opener untouched is the most common gap at turnover. Rolling-code technology, which changes the transmitted code on every press, defends against someone capturing a signal from the curb. It does nothing about a remote that was never returned.
Nearly every modern opener has a learn or smart button on the motor head. Holding it down until the indicator light goes out, commonly around six seconds, erases every paired device from memory at once: handheld remotes, visor clips, the wireless keypad, and any vehicle button. Do that first, then re-pair only the devices you are handing to the new tenant.
A few pieces get missed even by owners who know the learn button:
- The wireless keypad: It is its own paired device, so wiping the opener's memory de-pairs it. Re-teach it with a new PIN rather than reusing whatever was written on the inside of the door.
- Vehicle buttons: Built-in in-car transmitters hold a trained channel until either the car or the opener is cleared. Erasing the opener memory is what actually severs that link, since you have no access to the previous tenant's vehicle.
- App and cloud access: If the opener or an add-on hub is tied to an account the previous tenant created, they may still be able to open the door from anywhere. Only the account holder can remove themselves, which is why many owners keep the door's app account in the property's name and issue revocable guest access instead.
- Hardwired switches: An exterior key switch or a keyed release on a detached garage needs the same treatment as any other lock.
Count the remotes you issue and note them in the file, so move-out has a number to reconcile against.
Springs, Cables, and Counterbalance: Look, Do Not Touch
The counterbalance carries the door's weight so the opener only has to overcome friction and inertia. On most doors that means torsion springs on a shaft above the opening, with steel cables wound onto drums at each end. Older and lighter doors may use extension springs stretched along the horizontal tracks instead. Either way, the assembly holds serious stored energy even when the door is sitting still, and the power is off.
Your job at turnover is to look, not to touch. Bring a flashlight and check for a visible gap in a torsion coil, which means a broken spring; rust or coil separation; a lift cable with broken strands standing out from the wire; slack cable pooling near a drum; and a door that sits with a visible tilt when fully closed, which often means one cable has slipped a groove. Extension-spring doors should also have a containment cable running through the center of each spring and anchored at both ends.
A balance check tells you whether the counterbalance is still doing its share, but only run it if the walk-through above turned up no visible spring, cable, or bracket damage; skip the lift test and call a technician instead if it did. With the door fully closed and the opener disconnected, lift the door about halfway by hand and let go. A balanced door stays roughly where you left it. If it drops, climbs, or feels heavy enough that you would not want to hold it, stop and call a technician.
What no owner should attempt: winding, unwinding, adjusting, or replacing springs and cables, or loosening the bottom bracket bolts, which sit under full cable tension whenever the door is down. That work belongs to a trained technician with winding bars, and no version of it is safe to learn on a rental.
Weather Seals and the Complaints That Follow Them
Seal failure generates more tenant emails than almost anything else on the door, usually phrased as drafts, dust, insects, water across the slab, or a utility bill that seems high for the square footage. The relevant parts are the bottom seal, typically a vinyl or rubber bulb held in an aluminum retainer along the bottom section; the perimeter stop molding with an integrated flap against each jamb and the header; the seals between section joints; and, where the slab is uneven, an adhered threshold seal on the concrete itself.
These materials work by compressing and rebounding. They lose that rebound as they age, and both temperature extremes push them the same direction: heat softens and permanently deforms a bulb that spends its day pressed against warm concrete, while cold stiffens the same material so it seals poorly until it warms back up. A seal that looks acceptable on a mild afternoon can be failing at both ends of the year.
Check it by standing inside with the lights off and the door closed. Daylight along the bottom or up a jamb is your answer. Also look for a wavy bottom edge where the retainer has been dragged, leaf litter or grit that made it inside, and any daylight in the corners, which the bottom seal alone cannot solve if the slab has settled.
Track, Rollers, and the Rest of the Walk-Around
Run the door once with the opener and once by hand and listen. Then walk it:
- Rollers: Nylon rollers with sealed bearings run quieter than steel; on any type, a stem that wobbles in the hinge or a roller that only turns intermittently is worn.
- Hinges: Section hinges are numbered by position. Look for cracks radiating from the pin, and for screw holes that have elongated into ovals.
- Track and brackets: Check for dents at the curve, gaps where the track pulls away from the jamb bracket, and lag screws backing out of the framing.
- Opener rail and arm: Chain or belt should be snug rather than sagging, and the header bracket and door-arm bolts should be tight. The motor head belongs on solid framing or proper angle iron, not hanging off drywall.
- Wall station: Mount it where the door is visible and out of reach of small children, and confirm the warning labels near the springs and on the wall are present and legible.
- Lubrication: A light garage-door-specific lubricant on hinge pivots, roller bearings, and springs; nothing greasy on the track face, which the rollers need to roll along rather than slide.
Building a Record for the Property File
The value of a photo record shows up later, during a deposit dispute or an insurance question, so shoot more than feels necessary and shoot it the same way every time.
A workable set: the door closed and open from inside, the springs and cable drums, both photo eyes with something in frame that shows their height, the bottom seal, the wall station, and the model and serial plate on the motor head. Phone photos carry a date in their metadata, so leave that intact and name the files by address and date rather than renaming them later.
Alongside the photos, keep a one-page checklist with the date, who performed it, and pass/fail entries for both reverse tests, with the method noted. Add the count of remotes and keypad devices issued. Fold the same photo set into the move-in condition report the tenant reviews, so any later damage claim has a baseline that both sides saw. Keep service invoices in the same folder, since a spring replacement date is the cleanest way to know how old the counterbalance actually is.
Where the Practical List Stops and Local Rules Begin
Some jurisdictions treat an attached garage as part of the dwelling for habitability purposes, and some do not. Inspection cadence, what has to be disclosed, and whether a written maintenance record matters are all things that shift by location, by lease language, and sometimes by what an insurer asks for after a claim. Read your own governing documents, and take specific obligations to your attorney or your local housing office rather than to an article.
The turnover list itself is short enough to run with a flashlight and a scrap two-by-four before the cleaners arrive. The parts of it you cannot safely run yourself are exactly the parts worth handing to someone who owns winding bars and knows what to do with them.
Frequently Asked Questions
Wear tracks cycles, not lease terms. A household leaving and returning twice a day runs roughly four cycles daily, while a shared driveway or a second vehicle can double that. Manufacturers commonly advertise standard residential torsion springs around the ten-thousand-cycle mark and sell high-cycle springs as a longer-life upgrade, so identical hardware can reach end of life in a few years in one unit and last far longer in another. Many owners book a professional service visit on a fixed calendar regardless of occupancy, and ask tenants in writing to report grinding, a door that stops partway, or a loud bang from the garage.
The reverse tests and code resets do not apply, but manual doors bring their own items. Extension-spring doors should have a containment cable threaded through each spring and anchored at both ends so a failed spring cannot travel. Check that the lift handles and the pull-down rope are intact, since a missing handle means people grab the section edge or the bottom seal instead. One edge case: if an opener is ever added to a door with a side-mounted slide lock or cane bolt, the lock has to be disabled or removed, because a tenant who throws it and then presses the button can buckle the top section.
Retrofit controllers usually wire in parallel across the opener's low-voltage wall-button terminals, so they can operate the door independently of anything you re-pair. Whether that device is now a fixture or the tenant's property is a lease question worth answering in writing before move-out. Practically, most owners have a technician remove the add-on wiring at the terminal block and restore the factory wall station, then re-pair the door fresh. Add-on hardware can also fall outside the opener manufacturer's warranty terms, which is worth checking before deciding to keep it in place.
Two things people rarely get right. First, release the cord only with the door fully closed: pulling it disconnects the trolley from the door, so an open door is then held up by the counterbalance alone, and a door whose spring is already weak or broken can drop with nothing left to check it. Second, re-engaging is not a service call: running the opener until the trolley re-latches, or on some models pulling the handle back toward the opener to reset the lever, reconnects it. Technicians discourage zip-tying or removing the handle to defeat the known trick of fishing the cord through the top of the door with a hooked wire, because it eliminates the only way in or out during a power failure. A release shield or repositioning the handle addresses the security concern without disabling the escape.
No. Coiling doors use a counterbalance spring inside the barrel and a curtain of interlocking slats, so there is no torsion shaft, no section hinges, and no lift cables to inspect the same way. Their operators often rely on a monitored sensing edge, a pneumatic or electrical strip along the bottom bar, rather than photo eyes alone, and constant-pressure controls are common. If the door is a fire door with a release mechanism, its drop testing is a separate scheduled item handled and recorded by someone trained for that specific procedure, not something folded into a turnover walk. Match the schedule to the manufacturer's instructions and your local authority.
They address one hazard. The pinch points between sections as the door folds around the curve are not monitored by anything, and a hand resting on a panel joint during travel is the injury that sends people to urgent care. Doors built with pinch-resistant sections use a tapered joint profile designed so a finger cannot enter the gap as the panels close on each other; older flat-panel doors have no such profile. Exposed roller stems and the area near the bottom bracket carry the same risk. Keeping the wall control high, keeping remotes out of children's hands, and treating a moving door as something nobody walks under covers what the sensors cannot.
Line up a turnover walk-through with a technician who already knows what a rental door has to pass: a garage door safety inspection covers both reversal systems, the counterbalance, and the access control in one visit, and landlords across the Georgetown service area book it between tenants. Squared Away Garage Door Service serves Cedar Park and Central Texas. Call (512) 456-3781.
